Painting a design or lettering on your costume can be guided by use of a stencil. But getting the stencil stabilized can be a problem. When you temporarily stick the stencil to the fabric by this freezer paper ploy, you get a neat product. This is easy and cheap. Get some fabric paint and experiment!
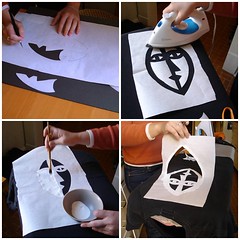
a. Using a piece of freezer paper, cut out the image that you want to see painted upon your t-shirt or other artifact.
b. A fine-point Xacto tool is helpful; you can also use scissors. You are cutting out the part on which you will be brushing the paint.
c. Trim the outside of the freezer paper pattern so it will be less awkward.
d. Placement of your logo may require some exploration. If you have a t-shirt or other garment with which to try the print before hitting the final destination, please experiment.
e. Place the waxy or plasticky side of the freezer paper "down," or against the fabric. The slick side has the temporary adhesive.
f. Iron the freezer paper down at medium heat. The idea is to melt the waxy stuff so the paper will stick to the fabric.
g. Paint over the open parts of the pattern with a small brush using acrylic craft paint. It is a waterbase paint that can be used, it says, on wood, plaster, clay and metal as well as fabric.
h. Allow to dry. Since we were in a hurry, we accelerated the drying process by blowing it with a hair dryer - on the cool setting.
i. Slowly peel up the paper pattern (using the edge of a knife can be helpful). Your paint pattern should have marvelous, crisp edges.
j. Experiment with all the stages above. Multiple layers of paint? We're guessing 2 layers is best. We tried 1 layer and it was uneven - it produced a funky opacity that some may like. We tried 3 layers and the paint tried to curl a little bit.
Take a photo of your project and share it, please. Send the jpeg to trudeau@earthlink.net. Merci!